In December 2019 I will be once again traveling to the seventh continent – Antarctica. In preparation for this journey I decided to finally write my article outlining my experience from my first trip in 2010 with Quark Expeditions aboard the Akademik Ioffe. Rather than provide a day by day account of my journey, this article is a guide to tips and recommendations as a result of my experiences. For a day by day account you can download my photobook Antarctic Expedition on the Travel blog section of my website.
Equipment
- Hat – I used The North Face Fleece Beanie. This completely polyester knit beanie has an inner soft fleece lining around the band to keep your ears warm so you won’t need earmuffs.
- Sunglasses – Antarctica has a lot of snow and ice which reflects the sunlight so a good pair of sunglasses is necessary to prevent snow blindness. Sunglasses should be worn at all times even when its cloudy to prevent excessive UV rays from reaching your eyes. I used the REVO 3068 096/X7 sunglasses with good UV protection, polarized lenses and curved lenses.
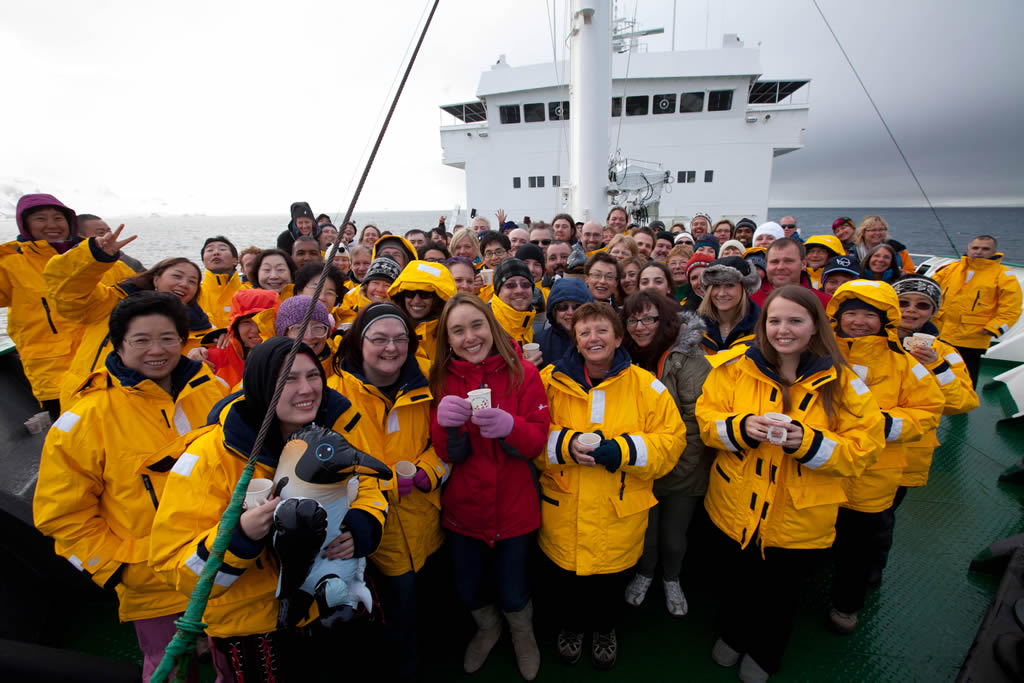
- Parka – Quark Expeditions provides you with a bright yellow parka as part of the expedition package. The high quality parka consists of a waterproof, wind resistant and fully adjustable outer shell with multiple pockets, reflective strips and a zip off hood. It has a removable inner fleece jacket on the inside that attaches to the outer shell. Each part of the jacket can be worn separately.
- Tops – Like in most cold weather environments it is recommended to layer. As a base layer I used a Nike compression shirt and a top layer of either a sweater or light sweatshirt. For times when I would only briefly go out on deck I used my waterproof, microfleece-lined jacket I picked up in Alaska.
- Gloves – I used Roots deerskin leather gloves (basically these gloves rebranded). While not extreme cold weather gloves, they do have a thinsulate lining, leather on the palms and fingertips and spandex on the back.
- Bottoms – Cotton-based pants and jeans in particular are not recommended at all. I used a pair of Claiborne cotton/spandex pants and a pair of polyester based hiking pants. Rather than spend money on thermal underwear I simply used boxer briefs as a base layer. The reason thermals are unnecessary is that anytime you are going onshore you are required to wear rain pants. I used a pair of Musto waterproof pants (similar to these). The Musto pants are waterproof, windproof, have a reinforced seat and are fully adjustable. As a result I was sufficiently warm with these three layers.
- Socks – Like jeans, cotton socks should be avoided. I used Thorlo Wool/Thorlon Thick Cushion Hiking Socks to keep my feet warm. These socks are made from a combination of acrylic, wool, nylon and elastic with an extra thick layer on the sole. To help wick moisture away I also wore a thin pair of rayon (artificial silk) socks underneath these socks for the ultimate warmth.
- Boots/Shoes – Quark Expeditions loans each passenger knee-high rubber boots to be worn in the Zodiac and for shore landings. Around the ship and in particular out on deck where it is extremely icy and slippery you need to wear shoes with good grip. I used a pair of Nike mid-top sneakers.
- Camera – I used the utlra-compact Canon Powershot SD600 6MP point & click camera. With dimensions of 3.39″ x 2.11″ x 0.85″ and a weight of less than 5 ounces it was easy enough to slip this tiny camera in a waterproof pouch and into my pocket. The 3x zoom was pretty limiting for getting close up photos of some of the wildlife though.
- Suitcase – Quark Expeditions recommends bringing soft luggage such as duffle bags rather than suitcases for easy storage in your cabin (where space is very limited). I used my large Jansport duffle bag to carry all my equipment. Also remember you need to leave some room to carry your new parka home with you.
- Money – While you can charge items to your room when purchasing souvenirs onboard the ship, we did have the opportunity to buy souvenirs at one of the research stations we visited, so have a bit of cash on hand (US dollars or Argentinian pesos).
Getting There
The tourist season in Antarctica is from November to March which coincides with spring and summer in the southern hemisphere. The most common way to reach Antarctica as a tourist is by ship from Ushuaia, Argentina at the tip of South America across the treacherous Drake Passage to the Antarctic peninsula. It is a journey of 500km taking 2 days to complete.
The first step is getting to Ushuaia. My brother and I went on one of the first voyages to Antarctica in late November leaving Bermuda for Atlanta and stopping in Buenos Aires, Argentina for the night. Miami is the main gateway to South America for North America meaning extremely long US immigration lines on your return flight. Non-US residents can expect up to an hour wait in line. Atlanta is a less used arrival point for South America so lines are much shorter even though flight times are slightly longer and airline tickets slightly higher than for Miami. Flight time from Atlanta to Buenos Aires is around 10 hours so it made sense to take a break before proceeding directly to Ushuaia. At the time my brother and I only had Bermudian (British Overseas Dependent Territory) passports (we didn’t have British passports) but Argentinian immigration treated them just like British passports. Other South American countries are less familiar with Bermudian passports and you can run into trouble and delays with immigration like I did when traveling to Uruguay. In addition to providing us with some time to rest, the stopover also allowed us to scout out shopping locations for souvenirs and for me to order a tailored suit to pickup on our return stopover at the end of the trip. Our return stopover would be for 2 days allowing us to tour Buenos Aires and shop.
The flight to Ushuaia is a reasonable 3.5 hours. Ushuaia is the capital of Tierra del Fuego and the southernmost city in the world hence its title of Fin del Mundo (End of the World). While Buenos Aires is downright balmy and hot in the spring (T-shirt and shorts weather during the day), Ushuaia never really warms up. While we were there it never went above 10 degrees Celsius and even snowed (light flurries) shortly after we arrived. As a result you will need a decent warm jacket and possibly gloves while here. The next day before embarkation we had time to explore a little of the city (which is really not that big).
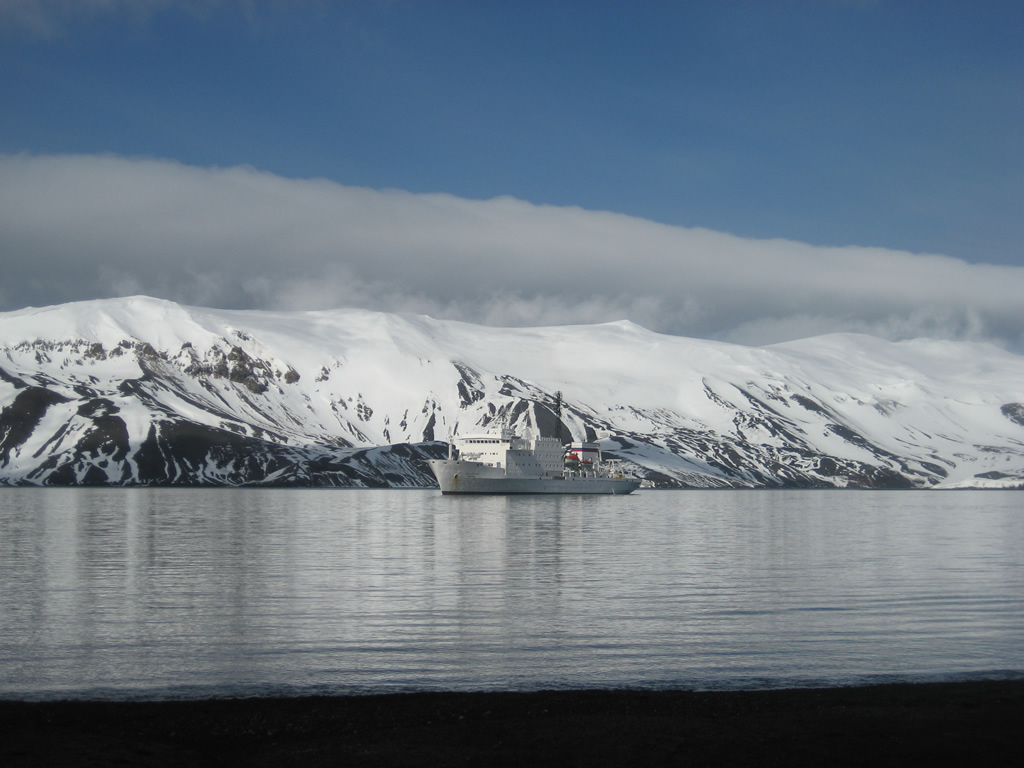
The ship we traveled on was the Akademik Ioffe, a Russian Arctic research vessel with an ice-hardened hull. It carries around 100 passengers and is one of the smaller ships used to carry tourists. Its facilities and cabins are very spartan. Lower deck cabins only have a sink in them and passengers in those cabins must use shared showers and toilets. Mid-deck cabins like my brother and I had share a common bathroom with the adjoining cabin. Each cabin has a door to enter the bathroom meaning you should remember to lock both doors when using it. The bathroom is a single room with a sink and toilet and a shower at the center of the room. You can draw a shower curtain to keep from getting the sink and toilet wet. You must also remember to either enter the bathroom barefoot or in shoes in case someone has just taken a shower. I soaked a few pairs of socks forgetting this. Inside the main cabin there is a small desk, a bunk bed and a couch/bed near the porthole wall. My brother slept on the bottom bunk while I slept on the couch/bed. I am guessing they didn’t recommend anyone using the top bunk due to the rough seas. Facilities-wise there is the dining hall, bar, and lounge area with TV and a selection of DVDs (including John Carpenter’s The Thing). There was an open bridge policy (with a few exceptions) whereby you could enter the bridge as long as you stayed out of the way and reasonably quiet.
The Drake Passage is the area of ocean off of the Cape Horn of South America where the Pacific and Atlantic Oceans meet. It is known as one of the roughest stretches of water and thus the journey by ship across it is known as the “Drake Quake”. On rare occasions you may encounter the “Drake Lake” when it is perfectly calm. For our trip we actually lost a day milling about in the Beagle Channel due to a Category 11 storm (37-52 foot swells) in the Drake Passage. We wouldn’t venture into the Drake Passage until the storm had subsided down to a Category 7 storm (13-19 foot swells).
For the two days crossing the Drake Passage expect continual extremely rough seas for the entire time. If you are prone to sea sickness you might want to take something for it before you make the crossing. My brother was able to get some sea sickness pills from the ship’s doctor. The one side effect everyone who took the pills mentioned was extremely vivid dreams. I had purchased a Voyager Reliefband for Motion Sickness (1.5 Classic model). This wristwatch-like device is placed over the two tendons on the underside of your wrist where it sends electrical pulses along your median nerve to your brain to quell any motion sickness. I tried it out beforehand and found the electrical pulses (more like small electrical shocks) a little uncomfortable even at the lower settings. I had been on ships in very rough seas prior with no ill effects so as a result I opted not to use the Reliefband or take any sea sickness pills. I actually found the rolling, pitching and yawing quite relaxing and enjoyed being rocked to sleep each night.
Sea sickness aside you also want to be very careful as you navigate the ship. You may want to adopt the “3 points of contact” rule when moving about the ship. This means you want to have 3 firm points of contact with the ship – whether that be two hands on a handrail and one foot on the ground or two feet on the ground and one hand on a handhold.The staircase to the bridge was very steep meaning you want to go down these stairs backwards (facing the stairs). You also don’t want to perform any type of close, precision activity during this time like having a shave. Needless to say you want to stay indoors during this time and avoid going out on deck or opening any windows. Most importantly you should take every measure to avoid injury. The ship’s doctor, although highly trained (ours was an experienced emergency room physician), can only do so much and has limited facilities to treat any major injuries. In addition, attempting to treat an injured person in rough seas is not something you or he wants to do. Everyone is required to get medical evacuation insurance (typically $100,000+). However, while in Antarctica, medical evacuation can be days away. Also don’t forget you will be repeating this two day journey on the way back.
The Climate
Firstly, the Antarctic Peninsula region which most tourists visit does not get as cold as you think. Typical spring/summer temperatures hover around 0 degrees Celsius (plus or minus a few degrees). Even in the winter the temperature doesn’t drop lower than a typical northeast US winter. After spending five winters in Halifax, I felt comfortable leaving thermal underwear off my equipment list. The Antarctic Peninsula is also one of the only spots in Antarctica to experience any significant precipitation. This comes in the form of snow and rain. We only experienced snowfall on two days, one quite mild while our last outing onshore had some pretty heavy snowfall.
One unique feature of Antarctica is that the air is absolutely clear of dust and pollutants. What this means is that on a clear day you can see miles in the distance with no haze. I compare it to seeing the world in high definition. The clear air also means that no matter how cold it gets you will not “see your breath” when you exhale. This is virtually impossible as the exhaled water vapor has no dust particles on which to attach to form tiny visible ice particles.
During the spring/summer it never gets dark (similar to Alaska and other Arctic countries’ Midnight Sun). The darkest it gets is a dusk/twilight. There is up to 20 hours of sunlight meaning your ship should have heavy curtains to block out the always present sunlight when you are trying to sleep at night.
Riding the Zodiac
There is very little infrastructure in Antarctica i.e. no docks or ports by which to get off the ship and onto shore. The most common form of transport to get onshore is via Zodiac – a rigged hulled, inflatable boat. Zodiacs tend to be very spartan boats with a single outboard motor at the back. Guests will sit on the sides with up to 10 guests in a Zodiac along with the driver. Getting on the Zodiac requires you to descend a staircase lowered off the side of the ship down to water level. At the bottom you are assisted stepping onto the Zodiac. You are reminded to use the “sailor’s grip” when stepping on or off the Zodiac. The sailor’s grip occurs between two people who assist each other not by holding onto each other’s hands but by grasping the forearm of the other person just above the wrist. The idea is that even if one person releases their grip, the other person can still be holding onto them.
Shore landings can be either “dry” or “wet” landings. Dry landings occur if you are able to step off of the Zodiac directly onto a rocky outcropping. Wet landings occur if the Zodiac lands at a beach. The Zodiac can only come in so far requiring guests to swivel off the side of the boat, drop into the shallow water and wade to shore. The wet landings are part of the reason you need knee-high boots and waterproof pants. The waterproof pants need to go over the boots i.e. outside the boots not tucked inside them. The reason being that if the water is deeper than a few feet, water won’t begin pouring into your boots soaking your feet with freezing cold seawater.
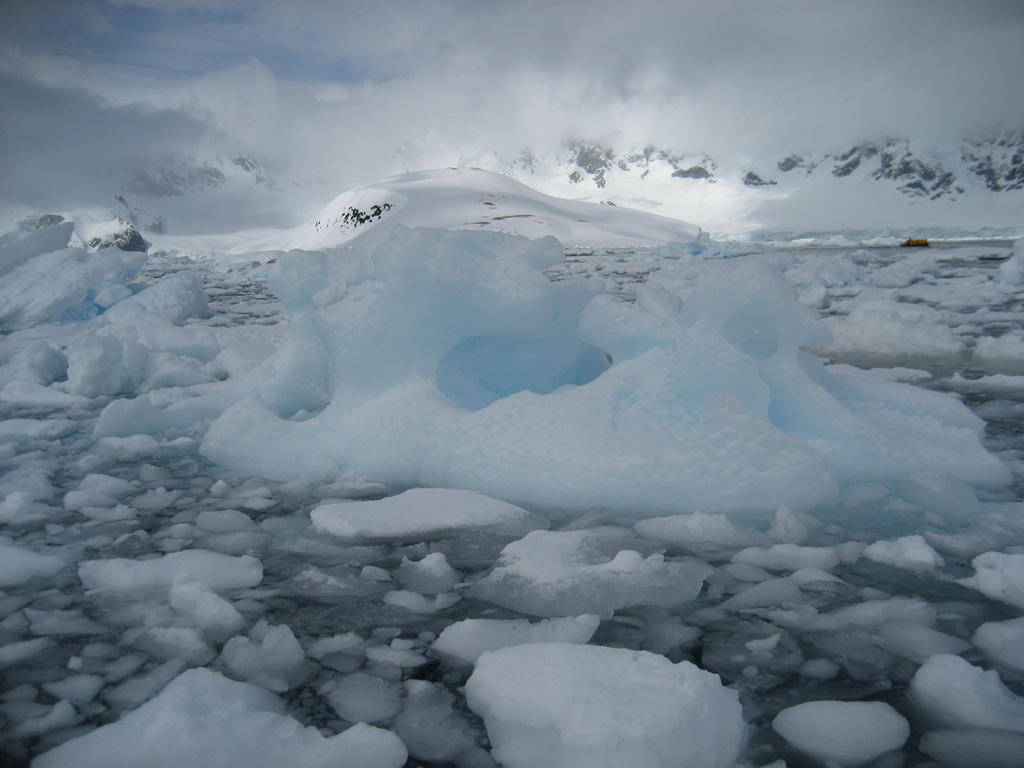
On occasion you may just simply cruise among the icebergs in the Zodiac. We did this on two occasions. The first time was, due to the early season unmelted snow and ice, there was no way to get onshore. The second time was planned, allowing us to view penguins, whales and seals among the icebergs. While cruising among the icebergs there is the real danger of an iceberg either calving (a large piece splitting off) or melting enough to shift its balance, effectively causing the iceberg to flip over or onto its side. In each scenario this can cause a rather large wave which could potentially swamp or capsize a nearby Zodiac and its passengers. In the event your driver sees this happening he will shout out and signal something like “Get down!” at which time everyone should slide into the center of the boat, get down low and hang on tight. The driver will immediately gun the engine, turn the Zodiac around and try to get as far away from the impending wave.
What ever you do, try not to fall overboard. You are given a life jacket any time you are in the Zodiac, however you are also wearing a lot of clothing and equipment. Trying to drag a waterlogged guest back into the Zodiac will take a lot of effort. Not to mention hypothermia can set in in under 15 minutes meaning you will be in an emergency situation.
Take a look at the second section of my Antarctic Montage video below titled “Riding the Zodiac” to see a first hand account of all of the above.
Exploring on Land
Before you even go ashore you must decontaminate any clothing or equipment you will be taking onshore. We were given access to vacuum cleaners in order to remove any potential contaminants such as seeds, soil or anything that could upset the delicate ecological balance in Antarctica. In addition you are required to decontaminate your boots by stepping into a solution and scrapping the soles on scrubbing brushes every time you leave the ship and return again. In this same vein, “relieving” yourself while onshore is definitely not allowed.
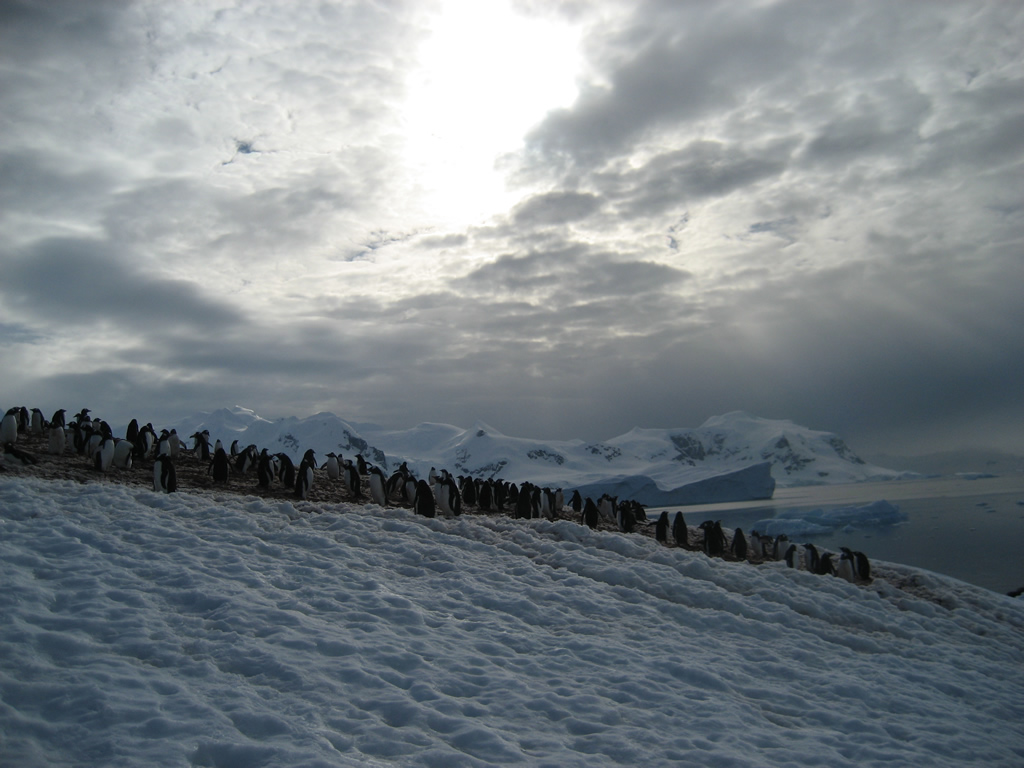
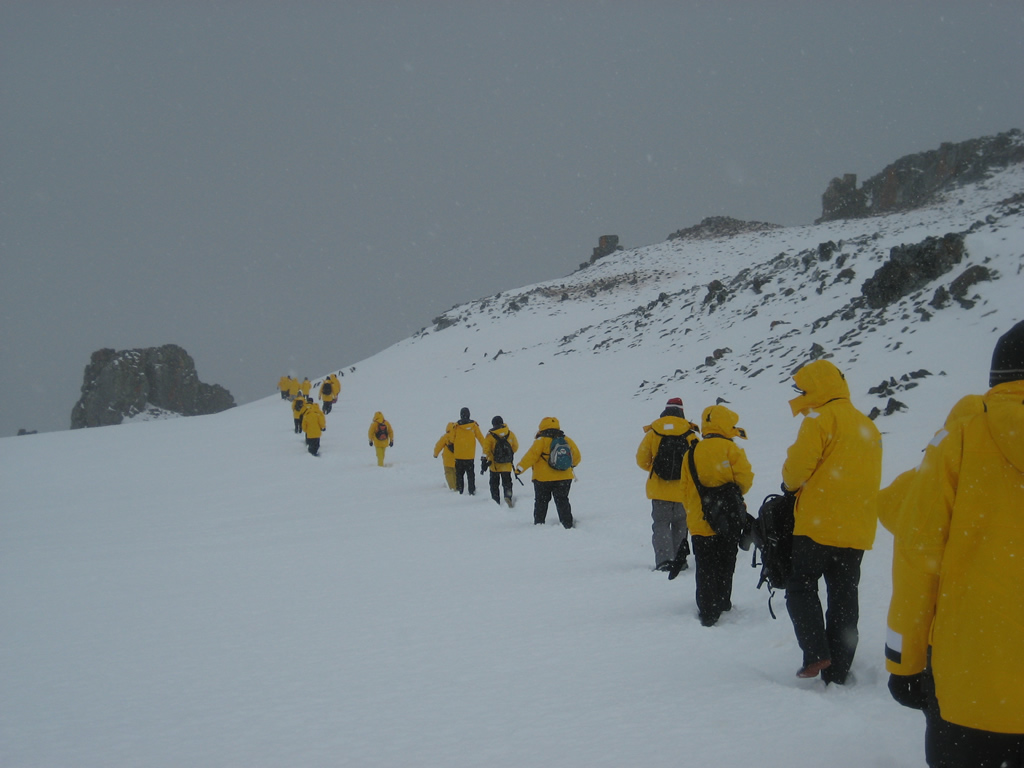
What should you expect once you do finally make it onshore in Antarctica? Regulations require no more than 100 people onshore at a time. The Akademik Ioffe only carries about 100 passengers so everyone was able to go ashore at the same time for around 3 hours. Depending on the time of season of your trip you may be met with deep snow or muddy conditions onshore. This is the other reason you are required to wear boots. We were there pretty early in the season so there was only deep snow everywhere. Later in the season the snow melts leaving generally mud everywhere. The snow can be as much as 1-2 feet deep early in the season. In these conditions you are reminded to follow in the footsteps of your guide to avoid any literal pitfalls. In addition we were reminded to fill in the deep holes our footsteps created as these pits could potentially trap small penguins in them leaving them trapped to starve to death.
Sunglasses should be worn all the time and the effects of extreme glare and the powerful UV rays in Antarctica should not be understated. Snow blindness is a very real risk and often you won’t know it has happened until many hours later. We had a 12 year old girl on our trip who forgot to take her sunglasses while going on a snow hike. Some time after returning she realized she had suffered from mild snow blindness. Her eyes were still bloodshot the next morning at breakfast. She joked that her mom had taken her out drinking the night before.
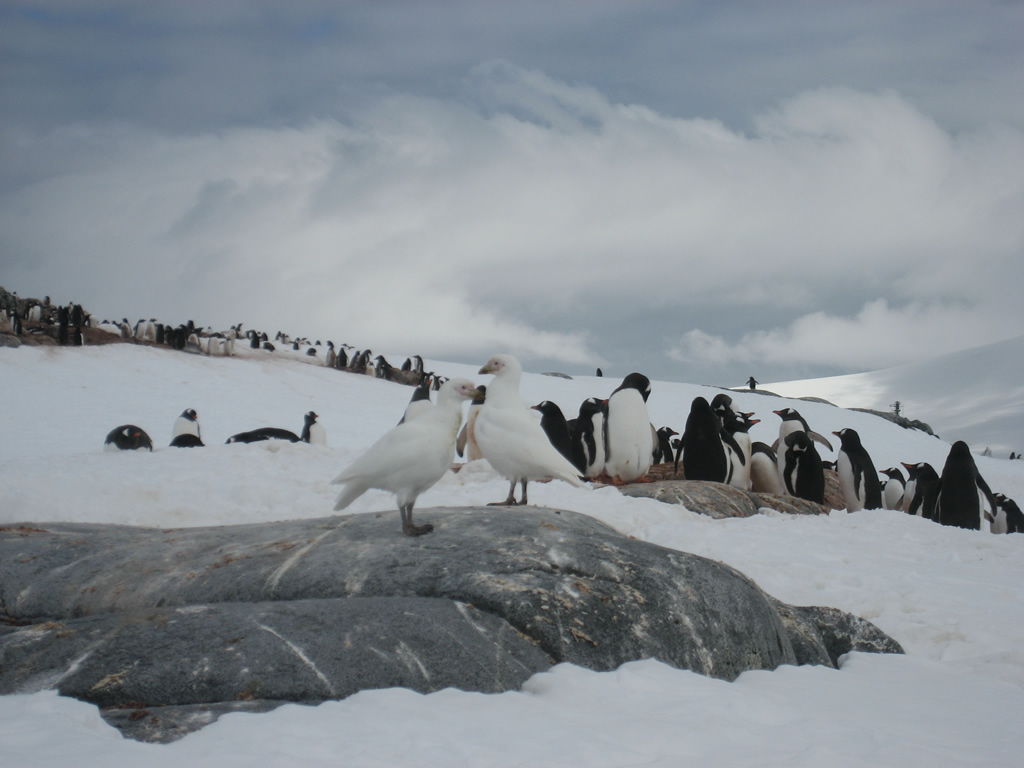
You will encounter a lot of wildlife onshore, most of it unafraid of humans. Most of this wildlife will be in the form of penguins (literally tens of thousands of them). You should stay away from any wildlife. It is okay for them to approach you, but you should never approach them, block their path or cross through their “highways” from the sea to shore. This avoids causing them undue stress. Some of the wildlife you should actually stay far away from. In particular the leopard seal is a large predator (up to 12 feet long) and although attacks on people are extremely rare, they have occurred. Even on land a leopard seal can run down a person.
There is a big difference going to Antarctica early in the season versus later in the season (aside from the presence of either snow or mud). Early in the season is more pristine as the penguins are just starting to come ashore for mating season. They haven’t yet urinated and defecated everywhere in the snow (it smells like fish). Later in the season you get to see the results of all that mating in the form of baby penguins.
In all matters you should follow the direction of your guide. Not doing so in this remote and harsh environment could lead to death. Despite this dire warning you can still have a good time. There are plenty of opportunities to take memorable photos and video. Our tour leader reminded us not to spend the entire trip looking at Antarctica through the lens of a camera. Enjoy being there while you are there. Photos and video are for family and friends – memories are for you.
Antarctica 00
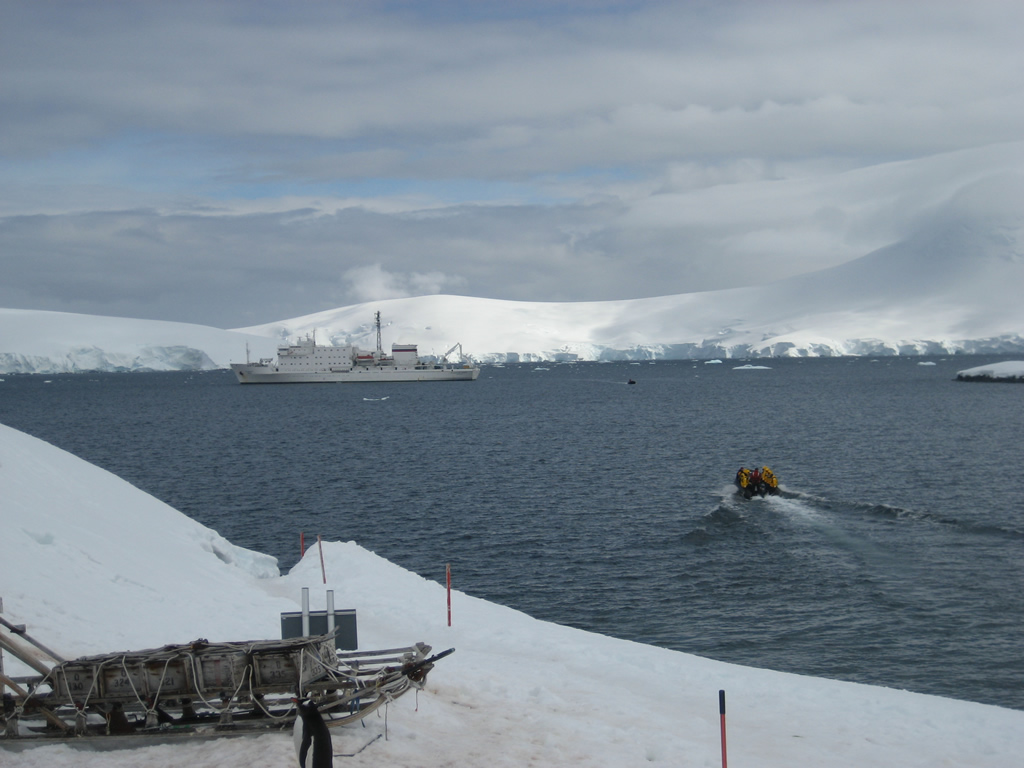
Akademik Ioffe
Antarctica 01
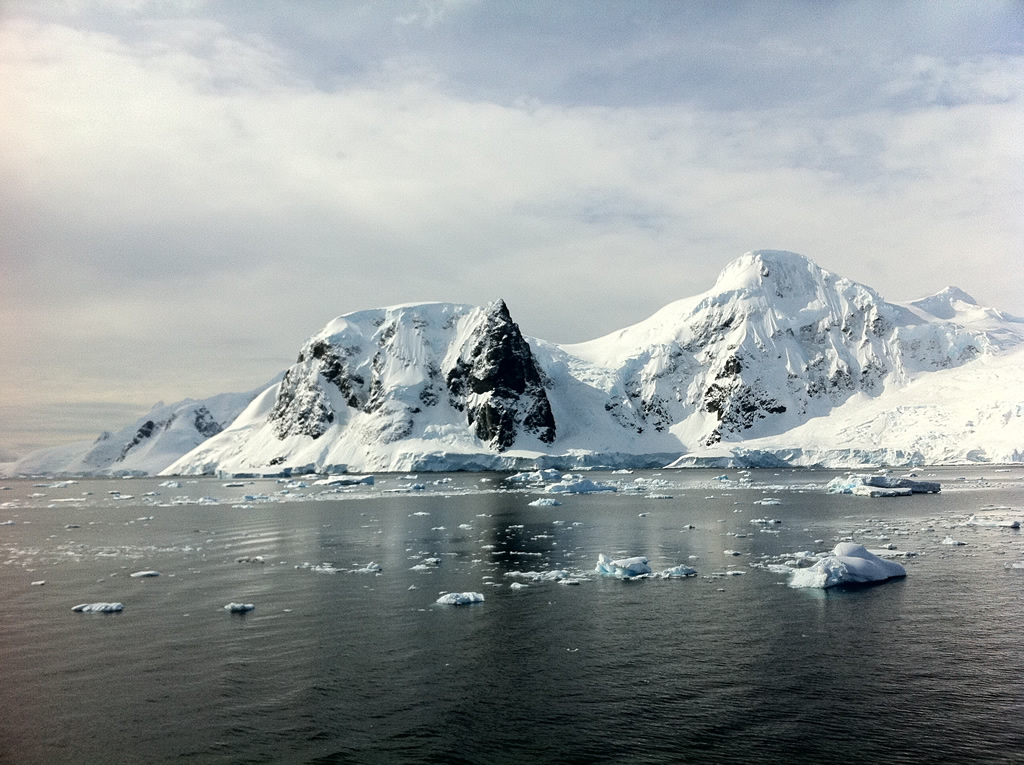
Lemaire Channel
Antarctica 02
Cuverville Island

Antarctica 04
Jougla Point
Antarctica 05
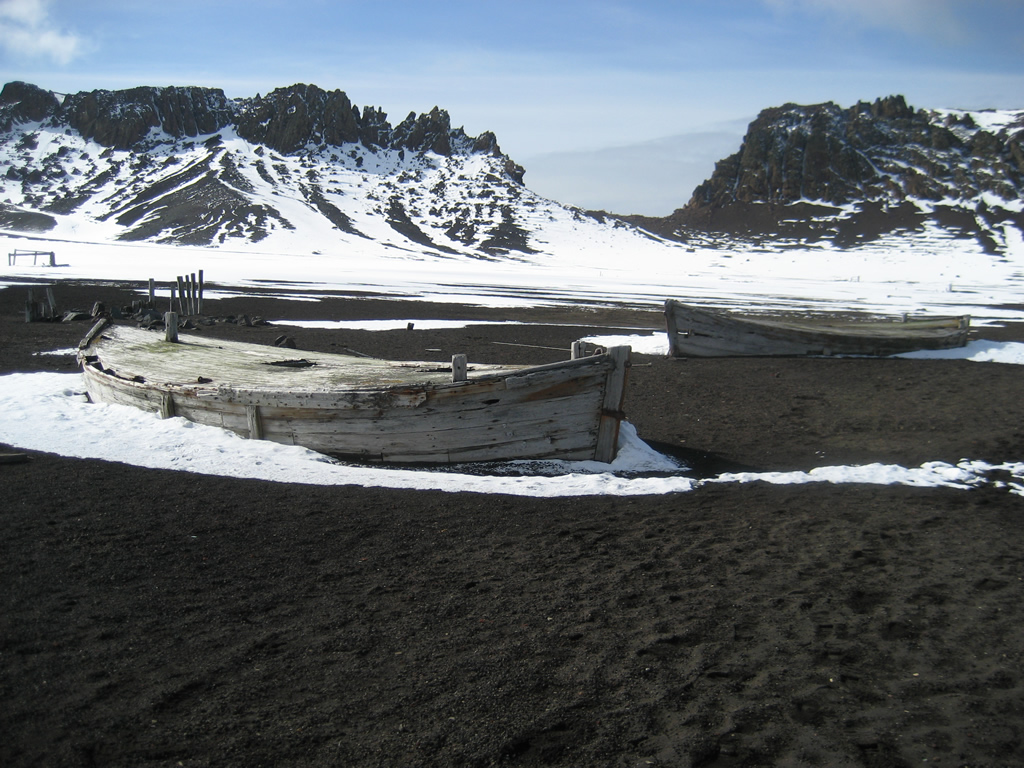
Deception Island
Antarctica 06
Jougla Point

Antarctica 07
Neko Harbour
Antarctica 08
Neko Harbour
Antarctica 09
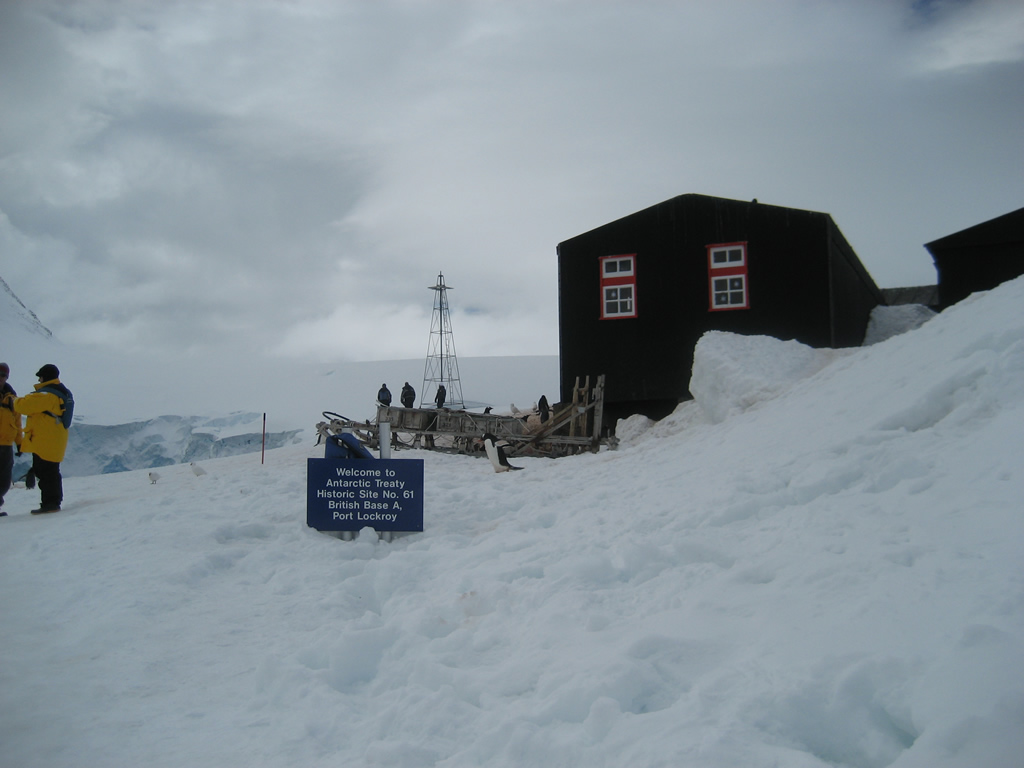
Port Lockroy
Antarctica 10
Port Lockroy
Antarctica 11
Half-moon Island
Antarctica 12
Akademik Ioffe
Lessons Learned
For my upcoming trip with Abercrombie & Kent aboard the very upscale Le Lyrial I will make the following changes to my equipment as a result of my experiences.
- Hat – I still have my The North Face Fleece Beanie which served me well on my previous trip to Antarctica and on Mt. Fuji.
- Sunglasses – I will be using the Global Vision Kickback Motorcycle Glasses I used on Mt. Fuji. These have the benefit of padding around the eyes to keep the wind out particularly as you are speeding along in the Zodiac. The padding also keeps out incidental UV rays from entering at the sides. The yellow lenses are useful for dusk without making your vision too dark. From the website liveaboutdotcom – Yellow or gold ski goggle lenses are excellent for flat light, enhancing detail so that you can better ski moguls, eye jumps, and avoid rough spots. Yellow ski goggle lenses are also optimal for snowy days, as the lens tint sharpens vision while filtering out the snow’s brightness. Because a yellow-colored goggle lens filters out blue light, this lens color can also be worn on sunny days, making it the best all-around ski goggle. I will be taking as backup my Swans Airless Leaf sunglasses (also good for the non-Arctic part of my trip in Argentina)
- Parka – Like Quark, Abercrombie & Kent provide a complimentary parka to all guests.
- Tops – I will be using a The North Face 1/2-zip pullover rather than my usual UnderArmour ColdGear Infrared 1/4-zip Mock. It is not fleece-lined so a little more lightweight than my UnderArmour pullover. I will be using it as a second layer over my Nike compression shirt (yup, the same one I used in 2010) or my Adidas compression shirt base layers. I will also be using my cotton/polyester blend light sweatshirts as a top layer. In the event I need some additional warmth, I will have my cardigan sweater used on Mt. Fuji. I also plan to buy the versatile Scottevest Revolution jacket for the non-Arctic parts of my trip.
- Gloves – Your gloves see the greatest use (and abuse) while in the Zodiac. This includes really getting wet and damage from the salt in the sea water. My Roots Deerskin gloves were absolutely ruined by the end of the trip. In addition the Roots glove only had a shallow Velcro cuff which although mostly covered by the parka sleeve does leave a bit of skin exposed when reaching or stretching your arm. This time around I will be using Kokatat Kozee Gloves. These are cold weather kayaking gloves but are appropriate for the watery environment you will encounter on the Zodiac, more so than using ski gloves. They also feature a deep, adjustable cuff and a “grippy” neoprene on the palm. As backup I will be taking a pair of fleece Sou Sou tabi gloves for wearing around the ship out on deck.
- Bottoms – I still have my Claiborne cotton/spandex pants while my hiking pants are now Prana Stretch Zion hiking pants. While the Prana hiking pants are not particularly warm they are pretty versatile for the other parts of my trip and don’t take up much room in my luggage. In addition I will be wearing rain pants over them so should be reasonably warm. I will be taking the same Musto waterproof pants. Abercrombie & Kent will also loan guests a pair of rain pants. As before I will be forgoing thermals and taking boxer briefs.
- Socks – I will be using the same Thorlo Wool/Thorlon Thick Cushion Hiking Socks and Nylon (rayon) socks underneath.
- Boots/Shoes – Like Quark, Abercrombie & Kent will loan guests a pair of knee-high rubber boots. For out on deck I will be using my Vivobarefoot Magna Trail hiking boots.
- Camera – I will be using my Nikon 1 J3 camera with 10-30mm, 30-110mm and 150-540mm lenses. A significant upgrade from my first trip. I should now be able to get all of those high definition, close-up shots of the wildlife. You can read about my camera setup here and here.
- Suitcase – I will be taking the Crumpler Spring Peeper wheeled duffle bag. While I had my Jansport duffle up until 2017 for my trip to Australia, I grew tired of physically dragging a large, heavy duffle bag through the airport. It was also showing its age with various parts breaking or tearing.
- Money – As before, I will make sure I have a bit of US dollars and Argentinian pesos on hand in the event we stop at a research station. This particular trip will also stop in the Falklands and South Georgia (both British) so I will have to prepare for that as well.
Some of my essential gear will be the same as my first trip to Antarctica. Part of this is due to the fact that I live in Bermuda and don’t travel to cold climates very often. As a result some of my previous gear doesn’t see much usage.